Friday, May 6, 2011

Our Resurrection Cross - A New Easter Tradition

A few days ago I started showing you some of the changes that we have made in our home for the Easter season. Today I'd like to share one more with you.

This year my husband made a large wooden cross with the boys during the season of Lent.

On Good Friday he talked to them about how Jesus was nailed to the cross and about His immense love for us. He took out 3 nails, let the boys look at them and hold them, and gave them a little poke on each of their hands and feet (don't worry...it was just a small poke) so that they would understand that it HURT Jesus. Then, they nailed 3 nails into the cross.

On Holy Saturday, we placed a cloth on the cross.

And on Easter Sunday, we began to decorate the cross with beautiful signs of life (i.e. paper flowers, butterflies, ladybugs, bees, etc) to celebrate Jesus' Resurrection.

It is now our Resurrection Cross and we have placed it in a prominent place in our living room, to remind us of Christ's love for us, and His victory over sin and death.

It is such a joy to listen to the boys as they tell everyone who comes to visit about their "Easter/Resurrection cross". They'll say things like,"Jesus is not dead anymore","Jesus got on the cross because He loves us so, so much", and "Jesus is risen and His boo boos don't hurt Him anymore". Precious.

Here are a few pictures...

Good Friday Cross


Holy Saturday Cross


Easter Sunday!!! - Resurrection Cross


Note: I have to give partial credit to Kimberlee and Dana for the inspiration behind this project (...the rest was Divinely inspired). Thank you for your beautiful ideas!


Lift High The Cross
Lift high the cross, the love of Christ proclaim,
Till all the world adore His sacred Name.

Led on their way by this triumphant sign,
The hosts of God in conquering ranks combine.

Each newborn servant of the Crucified
Bears on the brow the seal of Him Who died.

O Lord, once lifted on the glorious tree,
As Thou hast promised, draw the world to Thee.

So shall our song of triumph ever be:
Praise to the Crucified for victory.

Lift high the cross, the love of Christ proclaim,
Till all the world adore His sacred Name.

Words: George W. Kitch­in; mod­i­fied by Mi­chael R. New­bolt in 1916.
Music: Crucifer, Syd­ney H. Ni­chol­son, 1916

Thursday, May 5, 2011

Mother's Day Gift Idea #1 - Bath Salts/Potpourri Sachet Tutorial

This Saturday I am going out with several other young mothers for an early Mother's Day luncheon. I wanted to make some sort of appreciation gift for each mother and came up with this...


It is a handmade sachet filled with bath salts (after all, we could all use a nice, relaxing, hot bath every once in awhile).

Note: You could use potpourri rather than bath salts if you wish for an equally nice gift.

I will attach a little card to each sachet with this picture on the front:


 ...a short personal note of appreciation and this quote on the inside:  
"A mother is the most important person on earth. She cannot claim the honor of having built Notre Dame Cathedral. She need not. She has built something more magnificent than any Cathedral -- a dwelling for an immortal soul, the tiny perfection of her baby's body." -- Joseph Cardinal Mindszenty 

...and directions for use on the back.


The inspiration for the little pouch came from this Brighton Jewelery pouch that I had laying around...


In order to make one of these little pouches,
you will need:

4 & 3/4 in. x 14 & 1/4 in. Piece of Fabric
2 x 20 in. Pieces of Ribbon
Thread (matching)
Needle/Sewing Machine
Safety Pin
Strait Pins
Scissors
Note: 1/2 yd. of fabric makes 10-11 pouches


Step#1
Cut the fabric and  ribbons to the correct size/length.

Note: I made 11 pouches so I cut all of my fabric and ribbons right away.


Step #2
Measure 2.5 in. down the length of the fabric on the top and the bottom (i.e. down from the top and up from the bottom at all four corners), mark with a pencil, and snip 1/4 inch in.


Step #3
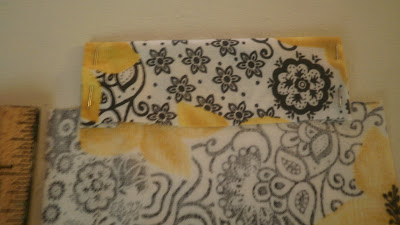
Fold the side of fabric over, then down, and pin.


Fold it down 1/4 inch past the slit.


Step #4
Using a small stitch (I use "2" on my machine) sew over the flap using a 1/2 inch seam allowance.


Step#5
Sew over the flap again using a 1 inch seam allowance (or 1/2 inch in from the last line of stitching).


Step #6 
Sew both sides of the pouch using a 1/4 inch seam allowance and turn the pouch right-side out.


Step #7
Take a piece of ribbon, fold it back an inch or so, and put a safety pin through it. Now, slide it through the hole on one side of the fabric then turn it around and slide it through the hole on the other side of the fabric.


Step #8
Using the second strand of ribbon, repeat Step 7 from the opposite end.


FYI...


Since you're all dying to know...my nail color is "cute as a button" by essie ; )


Step #9
Measure 1/2-1 cup bath salt into a baggie/individual baggies.


Don't say a word! I am well aware that this looks highly illegal...but it is bath salt...I promise.


Step #10
Place the baggie(s) into the pouch(s), pull ribbons, and tie them in a bow!


So, would you like to know how much this project cost?

The fabric was $1.16, the ribbon was 45 cents/spool, and I already had the bath salts on hand (bath salts vary in cost...some are very inexpensive while others cost $$$) . The entire cost came to $2.06 + tax...which is approximately 20 cents per sachet!

Have a lovely Mother's Day!!!

Wednesday, May 4, 2011

20.5 Weeks...


To my dear family and friends...by your request...

pictures!


Note: These were taken 2 weeks ago (by my handsome Mister). I'll post current pics soon...I promise.


Tuesday, May 3, 2011

Earring Tutorial - Turquoise Beads

This past weekend I made a new pair of turquoise earrings from a necklace that I made several years ago...and NEVER actually wore.


 Would you like to learn how to make a pair? Read on!


You Will Need

Beads (you choose the color)
Beading Pliers
Earring Hooks
Beading Wire
Crimp Beads
Metal Loops (IDK what these are actually called but you'll see what I mean)

Here is the necklace...


I wanted to reuse all of those beautiful beads so I just snipped it with a pair of these...

Beading Pliers
...and then I started my project.

Step #1
Straiten/flatten the loop on your earring hook so that you can remove the existing bead(s) and add one of your "new" beads.


Step #2
Using the flat part of your pliers, bend the wire backwards and then, using the round part of your pliers, recreate a loop at the base of the earring hook.


Step #3
Take the metal loop and link it to the earring loop (you will have to open it slightly and then clamp it back together so that there is no space/gap. If you leave a space/gap then your link will easily break causing your earrings to fall apart).

Metal Loop


Step #4
String colorful beads of your choice onto the beading wire (this may look thick but it actually very thin and very flexible and easy to work with). I used 5 beads for the inner loop and 9 beads for the outer loop (depending on the size of beads that you are using you may want to use more or less).
Note: You can find beading wire at most craft stores and sometimes at Wal-Mart.


Step #5
Take your crimp bead and string all (4) of the wire ends through it.
Note: You can find crimp beads at most craft stores and sometimes at Wal-Mart.

Crimp Bead


Step #6
Now string all (4) of the wire ends through the metal loop, bend them around the loop and back through the crimp bead.
Tip: When stringing them through the crimp bead for the second time, it helps to push each wire through separately rather than all at once...it's a bit of a tight fit.


Step #7
Using the flat part of your pliers, squeeze the crimp bead flat over all the wires.


Step #8
Cut off all of the loose ends as close to the crimp bead as possible.
Tip: I have found that you can get a closer cut with a sharp pair of scissors than the wire cutter on the pliers.


Taa Daa!!!


 I just love the way they turned out and will be wearing them all Spring and Summer! I am planning to use the leftover beads to make a matching, double strand bracelet. 


Don't you think these would make a fabulous gift?


Happy jewelery making!