Showing posts with label Girl on a Budget. Show all posts

Monday, May 16, 2011

Pretty Little Tutu Tutorial - No Sewing Involved!

Our little girl is turned 1 this Sunday! I cannot believe how big and beautiful she is! She is such a joy to have in our family and is so happy and good natured. 

I thought and thought of the perfect one-year birthday gift for a little girl and more specifically our little girl.

I don't know if I have ever written about my passion for encouraging "real" play within our home...someday I will. In a nutshell, I believe we live in an overly busy and electronic age and that children don't REALLY play (or even know HOW to play) anymore unless they are encouraged. I have been falling increasingly in love with all things Montessori and have several play "stations" (hee! No pun intended) set up throughout our home. These stations are VERY simple. They consist of baskets/boxes of toys that encourage our children to use their imaginations (For instance we have a dress up box, a play kitchen with a large variety of wooden and cloth food, a basket of play-silks, art supplies, building blocks, Duplos, , etc...).

...Well, as I was thinking about THE perfect gift for our little lady, that would also encourage "real" play, I came up with this..."girly" things to add to our overwhelmingly "boy" dress-up box.

I took a trip to a couple thrift stores in the area and found 2 beautiful (think royal wedding style) hats, 5 pairs of ladies gloves, and some long necklaces. (I know that second-hand hats can be a little frightening, BUT did you know that you can simply slip any "un-washable" item into a zip-lock bag and put it into the freezer for 48 hrs and it will eliminate any bacteria or little pests that might exist on it? Neat huh?)

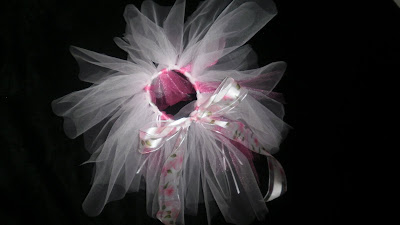
Next, I set to work making a couple of little things. One of the gifts that I made for my little princess is this pretty little pink tutu...


Today, I have put together a tutorial so that you too can make a tutu! ; ) Just follow the steps below.(It is SO EASY. I promise!)

Note: I realize that some of my photos are sideways or upside down but I just didn't have the time to turn them all the right way. Please forgive me.


You Will Need:

2 spools of ribbon 
(you'll end up using a 1/2 spool of each color so you can make 2 tutus with 2 spools of ribbon)

1.5 Yards of Tulle (sp??)
(I used 1 yard of light pink tulle and 1/2 yard of hot pink tulle in order to give the tutu a two-toned appearance)

Tip: Have the tulle cut in 1/2 yard strips.

Scissors


Step #1
Choose 2 spools of ribbon (one wide and one narrow) and coordinating tulle. Unroll the spool of wide ribbon and cut it in half (approx. 2 yards)


Step #2
Fold each piece of tulle in half and cut it on the fold.


Step #3
Cut each double layer of tulle into 3 equal parts.


Step #4
Cut 10-12 pieces of narrow ribbon the length of one of the pieces of tulle.


Step #5
Fold each piece of tulle in half over the wide piece of ribbon and tie in a knot.


Step #6
Between every few pieces of tulle, fold each piece of narrow ribbon in half and tie in a knot.


I love the way that this turned out.


Our little baby girl just LOVES her pretty new dress up things and wore the little tutu all day long.

Thursday, May 5, 2011

Mother's Day Gift Idea #1 - Bath Salts/Potpourri Sachet Tutorial

This Saturday I am going out with several other young mothers for an early Mother's Day luncheon. I wanted to make some sort of appreciation gift for each mother and came up with this...


It is a handmade sachet filled with bath salts (after all, we could all use a nice, relaxing, hot bath every once in awhile).

Note: You could use potpourri rather than bath salts if you wish for an equally nice gift.

I will attach a little card to each sachet with this picture on the front:


 ...a short personal note of appreciation and this quote on the inside:  
"A mother is the most important person on earth. She cannot claim the honor of having built Notre Dame Cathedral. She need not. She has built something more magnificent than any Cathedral -- a dwelling for an immortal soul, the tiny perfection of her baby's body." -- Joseph Cardinal Mindszenty 

...and directions for use on the back.


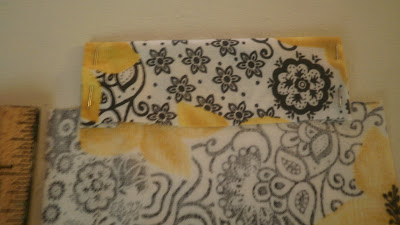
The inspiration for the little pouch came from this Brighton Jewelery pouch that I had laying around...


In order to make one of these little pouches,
you will need:

4 & 3/4 in. x 14 & 1/4 in. Piece of Fabric
2 x 20 in. Pieces of Ribbon
Thread (matching)
Needle/Sewing Machine
Safety Pin
Strait Pins
Scissors
Note: 1/2 yd. of fabric makes 10-11 pouches


Step#1
Cut the fabric and  ribbons to the correct size/length.

Note: I made 11 pouches so I cut all of my fabric and ribbons right away.


Step #2
Measure 2.5 in. down the length of the fabric on the top and the bottom (i.e. down from the top and up from the bottom at all four corners), mark with a pencil, and snip 1/4 inch in.


Step #3
Fold the side of fabric over, then down, and pin.


Fold it down 1/4 inch past the slit.


Step #4
Using a small stitch (I use "2" on my machine) sew over the flap using a 1/2 inch seam allowance.


Step#5
Sew over the flap again using a 1 inch seam allowance (or 1/2 inch in from the last line of stitching).


Step #6 
Sew both sides of the pouch using a 1/4 inch seam allowance and turn the pouch right-side out.


Step #7
Take a piece of ribbon, fold it back an inch or so, and put a safety pin through it. Now, slide it through the hole on one side of the fabric then turn it around and slide it through the hole on the other side of the fabric.


Step #8
Using the second strand of ribbon, repeat Step 7 from the opposite end.


FYI...


Since you're all dying to know...my nail color is "cute as a button" by essie ; )


Step #9
Measure 1/2-1 cup bath salt into a baggie/individual baggies.


Don't say a word! I am well aware that this looks highly illegal...but it is bath salt...I promise.


Step #10
Place the baggie(s) into the pouch(s), pull ribbons, and tie them in a bow!


So, would you like to know how much this project cost?

The fabric was $1.16, the ribbon was 45 cents/spool, and I already had the bath salts on hand (bath salts vary in cost...some are very inexpensive while others cost $$$) . The entire cost came to $2.06 + tax...which is approximately 20 cents per sachet!

Have a lovely Mother's Day!!!

Tuesday, May 3, 2011

Earring Tutorial - Turquoise Beads

This past weekend I made a new pair of turquoise earrings from a necklace that I made several years ago...and NEVER actually wore.


 Would you like to learn how to make a pair? Read on!


You Will Need

Beads (you choose the color)
Beading Pliers
Earring Hooks
Beading Wire
Crimp Beads
Metal Loops (IDK what these are actually called but you'll see what I mean)

Here is the necklace...


I wanted to reuse all of those beautiful beads so I just snipped it with a pair of these...

Beading Pliers
...and then I started my project.

Step #1
Straiten/flatten the loop on your earring hook so that you can remove the existing bead(s) and add one of your "new" beads.


Step #2
Using the flat part of your pliers, bend the wire backwards and then, using the round part of your pliers, recreate a loop at the base of the earring hook.


Step #3
Take the metal loop and link it to the earring loop (you will have to open it slightly and then clamp it back together so that there is no space/gap. If you leave a space/gap then your link will easily break causing your earrings to fall apart).

Metal Loop


Step #4
String colorful beads of your choice onto the beading wire (this may look thick but it actually very thin and very flexible and easy to work with). I used 5 beads for the inner loop and 9 beads for the outer loop (depending on the size of beads that you are using you may want to use more or less).
Note: You can find beading wire at most craft stores and sometimes at Wal-Mart.


Step #5
Take your crimp bead and string all (4) of the wire ends through it.
Note: You can find crimp beads at most craft stores and sometimes at Wal-Mart.

Crimp Bead


Step #6
Now string all (4) of the wire ends through the metal loop, bend them around the loop and back through the crimp bead.
Tip: When stringing them through the crimp bead for the second time, it helps to push each wire through separately rather than all at once...it's a bit of a tight fit.


Step #7
Using the flat part of your pliers, squeeze the crimp bead flat over all the wires.


Step #8
Cut off all of the loose ends as close to the crimp bead as possible.
Tip: I have found that you can get a closer cut with a sharp pair of scissors than the wire cutter on the pliers.


Taa Daa!!!


 I just love the way they turned out and will be wearing them all Spring and Summer! I am planning to use the leftover beads to make a matching, double strand bracelet. 


Don't you think these would make a fabulous gift?


Happy jewelery making!