Showing posts with label Recipes. Show all posts

Tuesday, May 24, 2011

C is for Cookie...


Yesterday, I wrote a post regarding our "plan" for the next 2 months of our lives...but alas, it has disappeared into blogland...somewhere out there...So, since I don't have any time to re-write it right now I thought I'd share my newest addiction with you. : )

A few hours ago, my littles and I whipped up a batch of these and (1 dozen cookies later) I have to say that they are the BEST C.C. COOKIES I HAVE EVER TASTED!  They are the perfect marriage of a crunchy outside and an oh so chewy inside....mmmm.


                                 Chewy Jumbo Chocolate Chip Cookies

Warning: These cookies are highly addictive.


Bon Appetite!


Note: I used 1/4 C less butter, 3 2/3 C flour, and stirred it all together with a spoon.

Friday, April 22, 2011

Easter Story Cookie Recipe! (perfect for littles)

A dear friend of mine just sent this Easter Story Cookie recipe to me today and we are going to put it to use tomorrow with our littles. I think that the idea sounds wonderful and that it is a perfect end of Lent/Easter activity for little ones. It is also a beautiful way to emphasize the passion, death, and resurrection of Christ on the last day before Easter. I can definitely see this becoming an annual Holy Saturday tradition in our home.  Enjoy!

Easter Story Cookie Recipe


EASTER STORY COOKIES


To be made the evening before Easter.


You Will Need:


1c. whole pecans

1 tsp. vinegar

3 egg whites

pinch salt

1c. sugar

zipper baggie

wooden spoon
wax paper

tape

Bible


Preheat oven to 300 (this is important--don't wait until you're half done

with the recipe)


Place pecans in zipper baggie and let children beat them with the wooden spoon to break into small pieces.

Explain that after Jesus was arrested He was beaten by the Roman soldiers.

Read John 19:1-3.


Let each child smell the vinegar.  Put 1 tsp. vinegar into mixing bowl.

Explain that when Jesus was thirsty on the cross he was given vinegar to drink. 

Read John 19:28-30.


Add egg whites to vinegar.  Eggs represent life.

Explain that Jesus gave His life to give us life.

 Read John 10:10-11.


Sprinkle a little salt into each child's hand.  Let them taste it and brush the rest into the bowl.

Explain that this represents the salty tears shed by Jesus' followers, and the bitterness of our own sin. 

Read Luke 23:27.


So far the ingredients are not very appetizing.  Add 1c. sugar.

Explain that the sweetest part of the story is that Jesus died because

He loves us. He wants us to know and belong to Him. 

Read Psalm 34:8 and John 3:16.


Beat with a mixer on high speed for 7-10 minutes or until stiff peaks are formed.

Explain that the color white represents the purity in God's eyes of those whose sins have been cleansed by Jesus. 

Read Isaiah 1:18 and John 3:1-3.


Fold in broken nuts.  Drop by teaspoons onto wax paper covered cookie sheet.

Explain that each mound represents the rocky tomb where Jesus' body was laid.

Read Matthew 27:57-60.


Put the cookie sheet in the oven, close the door and turn the oven OFF.


Give each child a piece of tape and seal the oven door.

Explain that Jesus' tomb was sealed. 

Read Matthew 27:65-66.


GO TO BED!


Explain that they may feel sad to leave the cookies in the oven overnight.

Jesus' followers were in despair when the tomb was sealed.

Read John 16:20 and 22.


On Easter morning, open the oven and give everyone a cookie.  Notice the cracked surface and take a bite. 

The cookies are hollow!  On the first Easter Jesus' followers were amazed to find the tomb open and empty.

Read Matt. 28:1-9

Happy Easter!
He is Risen!!!

Tuesday, March 22, 2011

Make Your Own Flower Food

Mush Alert!

This weekend my Mr went out of town to stand up in a friend's wedding. Let me tell you, there are very few things we LIKE  about being apart from one another...I mean the workday, five days a week, is hard enough...but we REALLY don't like being apart overnight!

That being said, there is at least ONE perk to being apart from one another...for a day or so...namely....the homecoming.

I usually will make him a nice meal, and write a mushy love note about how my life would never be as wonderful without him, and the littles help me make a "welcome home" sign...

 ...and when he comes through the door, he always brings with him a great number of these...


XOXOXOXO ...to go around...


...usually some of these...


...and most likely some of these...


These are the beauties I was lovingly presented with this time around.


Yes. Reunion is SWEET indeed.


Ok, so enough about us! I know YOU all want to know how to make food for your flowers! So, here is my recipe for keeping flowers fresh and lovely for as long as possible.


Flower Food

Directions:
  1. Cut each stem at an angle (this allows the flowers to take in water most efficiently).
  2. Add 1 quart of warm (not hot) water to a clean vase or jar.
  3. Mix in 1 tsp. white sugar (flowers love this stuff!) and 1 Tbsp. white vinegar (this thins the water/sugar mixture enough that the flower can take in what it needs and also helps prevent bacteria from growing in the H2O and thus entering and killing the flower).
  4. Repeat steps 1-3 every 2 days.

Sunday, March 20, 2011

Meatless Meals #5 - Baked Parmesan Herb Tilapia + A List of Other Meal Ideas

Today I'll wrap up my meatless meals recipes with one of our favorite meatless "mains"; Baked Parmesan and Herb Tilapia. My Mr loves this so much that he has told me he'd love for me to make it every single Friday.

(Since we have so many meatless meals that we love I have included a list of meal/main dish ideas at the bottom of this post).

Tilapia is one of my favorite fish to work with. Because it doesn't have a tremendous amount of flavor, (I'd compare it to chicken) you can add almost any seasoning you like, and it is extremely hard to go wrong.


Ingredients:

  • 3/4 cup butter
  • a zip of white wine
  • a zip of fresh lemon juice
  • 2 cloves garlic, minced
  • 1 cup dry bread crumbs
  • 1/2 cup grated Parmesan cheese
  • 1-2 tablespoons finely chopped fresh basil (dry basil may be substituted)
  • 1-2 tablespoons finelychopped fresh oregano (dry oregano or Italian seasoning may be substituted)
  • 1/4 teaspoon pepper
  • 1/2 teaspoon salt
  • 6-8 (4oz?) slices/pieces of tilapia

Directions

  1. Preheat oven to 350 degrees F (175 degrees C).
  2. Melt the butter with the garlic in a saucepan over medium heat. When the butter is almost all melted, add the wine and lemon juice. 
  3. When the butter starts to bubble, remove from the heat and allow to cool slightly. 
  4. Stir the breadcrumbs together with the Parmesan cheese, basil, oregano, pepper, and salt in a bowl. 
  5. Dip the tilapia in the butter mixture, then press into the seasoned bread crumbs. 
  6. Place the tilapia into a 9x13 inch baking dish.
  7. Bake fish in preheated oven 15 to 25 minutes or until fish just starts to flake.

    *Baking time will depend on the thickness of the fish you use. Watch the fish closely so that it does not overcook.
    *Note: This fish can also be made in a broiler.
    1. Follow steps 1-6 above. Broil 5 to 7(ish) minutes or until flaky and golden brown.


Hint: Set out a bowl of fresh lemon wedges on the table for those who'd like an extra splash of flavor.


For side ideas check the bottom of this post. Our favorites with this recipe are wild rice and sauteed/roasted yellow squash (...oooo...OR fresh cucumber, tomato, basil salad!!!...I'll have to share this recipe later on...it's perfect for the summer and so refreshing)...and when it's not lent we like a good white wine with this meal. 


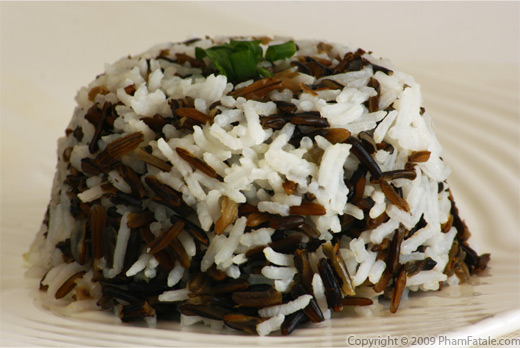
Wild Rice


Sauteed Yellow Squash

Cucumber, Tomato, Basil Salad


As promised, here is a list of some of the other meatless meals we LOVE:
  • Fresh Basil, Tomato, and Garlic Pizza (No sauce. Just E.V.O.O., sea salt, and pepper)
  • Fresh Spinach, Garlic, and Sauteed Mushroom White Pizza
  • Bowtie Pasta and Pesto Salad (with sundried tomatoes, artichoke hearts, pine nuts, and garlic... and a little feta tastes great with this)
  • Greek Pasta Salad/Pizza (with olive oil, sea-salt, pepper, garlic, tomatoes, feta, olives, capers, red peppers, and red onions)
  • Breakfast for dinner (i.e. fruit pancakes with cheesy eggs)
  • Pico De Gallo Quesadillas (with sour cream to top and black beans and fresh fruit as sides)
  • And when we've had a really loooong day and our cupboards are bare (well almost bare) we resort to Annie's Shells and White Cheddar Mac and Cheese!


I hope you find these recipes and ideas useful, and enjoy them as much as we do!

Saturday, March 19, 2011

Meatless Meals #4 - Bean 'n Cheese Enchiladas (Freezable!)

Today's meatless meal is Bean 'n Cheese Enchiladas. We absolutely love this meal and an added bonus is that it's a great "main" for making ahead and freezing. Isn't that spectacular?!

Note: This recipe serves approx. 7 (i.e. Our family of 5 + leftovers for my Mr's lunch the next day). 


 Ingredients:
  • Enchilada sauce
  • 1 (12 ounce) package corn tortillas
  • Black Beans
  • 8-16 oz. Cheddar cheese, shredded, divided (I like to use a LOT and grate my own to avoid any excess preservatives)
  • Sour cream
  • Green chile ( I usually make half the pan w/o green chile for the littles. We love 505 Southwestern Green Chile (med)).
Note: We also love to make these with shredded chicken or shredded beef...when it's not Friday of course!

Directions:

  1. Preheat oven to 350 degrees F (175 degrees C).
  2. Warm tortillas in microwave, or in oven; dip them in the enchilada sauce and lay them in a 9x13 inch casserole dish (I use my glass pyrex dish). 
  3. Fill each tortilla with black beans, cheese, sour cream, and green chile (or mild salsa for the littles); roll. 
  4. Repeat until dish is full.
  5. Sprinkle remaining shredded cheese over the top.
  6. Bake in preheated oven for 25 to 30 minutes, or until cheese is melted and bubbly. (I like to cover the dish with aluminum foil for the first 20 min and then remove it for the last 5-10. This helps hold the moisture in and keeps the enchiladas from becoming too dry).

Topping Ideas: 
  • Black Olives (sliced)

  • Sour Cream (additional)

  • Avocados (siced)

  • Fresh Tomatoes (diced) or fresh homemade salsa


Side Ideas:

  • Mexican Rice 
  • Fresh Fruit (we love sliced mango with this)


Mexican Rice

Fresh Sliced Mango


Enjoy!

Meatless Meals #3 - Salmon w/ Sauteed Mushrooms

Today's meatless recipe is baked salmon with sauteed mushrooms. This meal is super fast and easy and is one we'd serve when we have company. 

NOTE: My apologies. I've been under the weather, and  my Mr has been out of town, so no fancy cooking/baking going on at our house. All pictures are taken courtesy of the wonderful WWW...maybe one day I'll replace them with my own...we'll see.


Salmon:
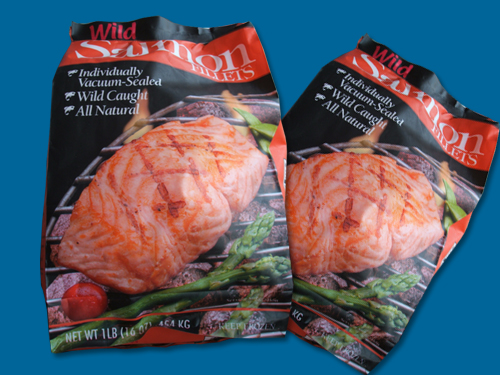
This is the package we buy. It always comes out tasty and is much more affordable than fresh salmon.


Each piece of fish comes vacuum packed and looks a lot like this.
Directions:
Pour a small amount of E.V.O.O. over the salmon and in the bottom of a pan. (I like to use a glass (pyrex) baking dish). Add white wine until it reaches about halfway up the fillets (optional). Sprinkle the top of the fish with dried herbs of your choice. Bake at 350 degrees for about 20-30 minutes, or until the fish is cooked through but not dry (cooking time will vary based on the size of the fillets so if this is the first time you've baked salmon check it every few minutes after the first 15 min.)

Tip: When the fish is done it should still be very moist but should flake when you poke it and twist with a fork. (I hope that makes sense?)


While the fish is in the oven saute a container of mushrooms. I like to slice or quarter mine and saute them in E.V.O.O. with a clove of fresh minced garlic (more or less for taste. garlic powder may be substituted), salt, and pepper.


When the fish is done take it out and re set the oven to broil. Place the sauteed mushrooms on top of the salmon and sprinkle (read: cover) with mozzarella and grated Parmesan/Romano cheese. Place under the broiler (with oven door open or oven light on so that you can watch closely...the broiler works FAST) for about 1 minute or until cheese is melted. 

SIDE IDEAS:
This tastes great with any combination of  roasted/baked potatoes, wild rice, or roll (choose one carb) and asparagus, steamed green beans, steamed broccoli, or broiled squash (choose one veggie). 

Carbs:

Baked Potato
Roasted Red Potatoes and Sweet Potatoes with Herbs

Wild Rice
Whole Wheat Roll


Veggies:

Grilled Asparagus

Steamed Green Beans with Slivered Almonds


Steamed Broccoli

Sauteed Yellow Squash


Bon Apetite!


Tuesday, March 15, 2011

Meatless Meals #2 - Tuna Wraps/Croissants

Today's meatless recipes are Tuna Wraps/Croissants. 

We like to serve these with fresh cut fruit or a deli style pickle spear.

Tip: When shopping for pickles, I try to avoid anything with dyes, high fructose corn syrup, or a lot of preservatives...I usually find these in the refrigerator section.

These wraps/sandwiches are so fast and delicious that I think we'll end up making them for lunch every Friday.


Here is the recipe for our "Classic Wrap":
  • 5-6 whole wheat/spinach tortillas
  • 1 package tuna ( I like to use the family 11oz packages by StarKist because it ends up being the perfect amount for our family. I also prefer this over canned tuna because tuna cans are lined with a plastic film that contains BPA) 
  • Mayo/Salad Dressing to taste (E.V.O.O. may be substituted for the mayo. Do what you like)
  • 2-3 on the vine tomatoes sliced (these tend to be a little smaller than other tomatoes but make up for it with their wonderfully fresh flavor)
  • Red onion finely chopped/thinly sliced (to taste)
  • Salt and Pepper (to taste)
  • Lettuce (we use what we've got which usually ends up being spinach, romaine, or Spring mix...we like dark green)
  • Provolone/Swiss Cheese (we prefer Provolone in Wraps and Swiss in Croissants)

For a little extra "zing" try a few of these optional additions:
  • fresh cilantro (chopped)
  • olives sliced (Calamari or black)
  • a zip of lemon/lime juice
  • a little pesto
  • minced Serrano pepper
Directions: Mix the tuna and mayo together. Add tuna and toppings to your tortilla. Wrap it up. Enjoy!

    Variation: If you're feeling adventurous try eliminating the tortillas and replacing them with large romaine/butter lettuce leaves (wrapping all the tuna and toppings in the leaves) and adding black beans. Yum!


    Romaine Lettuce Leaf
    Butter/Boston Lettuce

    Monday, March 14, 2011

    Meatless Meals #1 - Spinich and Grilled Shrimp Salad

    In lieu the fact that we are now celebrating the season of Lent, and that Fridays = No meat, I thought I'd share five of our favorite meatless meals with you (I'll share one recipe each day this week).

    Today's recipe is Spinach and Grilled Shrimp Salad. I'll include 3 variations.


    These salads are so delicious and super simple.


    Here's what you'll need for the base of the salad:
    • 1 bag baby spinach (you may also use a spring mix as pictured)
    • grilled (or sauteed or broiled) shrimp (baby or jumbo) *
    • 1-2 15 oz. cans of mandarin oranges
    • fresh diced tomatoes (optional)
    • roasted red peppers
    • sliced red onions
    • toasted sliced almonds 

    * Makes 3-4 large salads. Prep time will vary.

    Asian Shrimp Salad:  
    Add a handful of Asian noodles and serve with Asian Vinaigrette. (This also tastes GREAT with chicken!)


    Fruity Shrimp Salad: 
    Substitute chopped walnuts for the toasted almonds and add a handful of Craisins, a little Feta, and Raspberry Vinaigrette. Eliminate the roasted red peppers and red onions. (This also tastes GREAT with chicken!)


    Bacon Shrimp Salad: 
    (When we eat this on a day other than Friday we like to...) add (LOTS) of fresh chopped bacon and hot bacon vinaigrette (which you can purchase for under $5/bottle at Applebees...it can't be healthy but it's oh so delicious!). This  is our FAVORITE shrimp salad.


    Note: Our children are still a little young to enjoy salads but they LOVE to eat several shrimp (dipped in vinaigrette or catchup) with mandarin oranges and a roll/slice of bread/rice on the side. 


    * When I grill/broil/saute shrimp I like to add a splash of lemon/lime juice, a dash of garlic powder/fresh minced garlic, a little E.V.O.O., and pepper and salt to taste.

    Tuesday, March 1, 2011

    Make Your Own Hearty, Healthy, and Delicious Pancake Mix!

    Do you ever get that bloated, food coma, "I need a nap" feeling after a nice plate of pancakes? This used to happen to me every single time I'd eat them...which was a HUGE predicament because they happen to be one of my FAVORITE things to eat.

    I noticed that all of the instant mixes made me feel even worse so I browsed several cookbooks looking for the perfect pancake recipe and found one called "Favorite Pancakes" in my mother's Betty Crocker Cookbook...you know the one...old, red, falling-apart-at-the-seams...yeah that one.

    Let me just say that the name didn't lie...that recipe was GOOD. REAL GOOD. But it still didn't leave me FEELING good INSIDE.

    After a lot of reading and research about food, nutrition, and nourishment, I realized that the reason I didn't FEEL good after eating pancakes had everything to do with the ingredients. Hmmm...

     I decided to take this recipe and do a little tweeking...(which you'll find I do quite often)...

    ...and now I have what we call the "Betta' with Detta Favorite Pancake Mix". The cakes turn out light, fluffy, hearty, healthy, and delicious every time! Today I'll share my recipe with you.

    For one batch you will need the following:

    Wet Ingredients:
    • 1 Egg
    • 1C. Buttermilk (Tip: You can make your own buttermilk by adding 1Tbsp. vinegar to 1C. milk and letting it curdle for 30 seconds)
    • 1/3 C. Water
    • 2Tbsp. Extra Virgin Olive Oil (you can easily substitute melted coconut oil or butter for E.V.O.O.)
    Dry Ingredients:
    • 1C. Whole Wheat Flour
    • 1 Tbsp. Stevia (you can substitute honey or pure maple syrup but I use Stevia to make one less step for later)
    • 1 Tsp. Baking Powder
    • 1/2 Tsp. Baking Soda
    • 1/2 Tsp. Salt

    Derections:
    1. Mix all of the dry ingredients together first and set aside. (See picture below)
    2. Crack the egg in a separate bowl and beat it with a whisk until it is light and fluffy. (See picture below)
    3. Add buttermilk (for homemade b. milk see pic. below), water, and oil and stir.
    4. Set burner at "med." and begin heating your frying pan.
    5. Now add your dry ingredients to the wet ingredients and mix until everything is wet. The batter may be slightly lumpy. Do not over mix. (See picture below) 
    6. When your pan is hot (water should sizzle when sprinkled on it) grease pan with butter or coconut oil.(See picture below)
    7. Pour in 1/3-1/2 C. pancake batter and wait until the batter stops bubbling. (See picture below)
    8. Using a spatula, flip the pancake over. (See picture below)
    9. Wait about 30 sec.-1 minute and remove your pancake from the pan.
    10. Repeat steps 6-9 until all of the batter is used up.
    11. Add your favorite toppings and enjoy your delicious and nutritious pancakes! (See picture below)
    * makes approx. ten 4in. pancakes


    Tip: I like to mix several batches of the dry ingredients all at once to make my own pancake mix. For fast pancakes whenever you want them just stir together 1C. of the dry mixture and the wet ingredients listed above.

           Ta Da! Pancake mix to enjoy whenever you'd like! Tip: You can also pour your dry mix in an airtight freezer bag and store it it in the freezer for added freshness.


    Step #1 - Dry ingredients mixed


    Step #2 - Egg beaten with whisk until light and fluffy


    Step #3 - Buttermilk! Who knew it could be so easy? Can you see all that beautiful curdling going on?


    Step #5 - Dry and wet ingredients mixed without over mixing.


    Step #6 - This pan is just the right temp...can you see that butter? It is sizzling but not burning/browning.


    Step #7 - Puffy with no more bubbles coming to the top...this pancake is ready to flip.


    Perfecto!


    Now that is one hearty lookin' pancake!


    Hmmm...a sticky situation we have here....(No. I don't usually allow my "nearly two" to pour his own syrup...I guess you CAN have too much of a good thing!)


    Topping Ideas: Some of our favorite toppings include fresh cut fruit with a little honey/Stevia, fruit and yogurt, honey and butter, and real maple syrup and butter...oh! and fresh whipped cream is always welcome as a scrumptious addition to any of these.

    Wednesday, February 16, 2011

    Baked Sweet Potato Fries

    Tonight we're having green chili cheese burgers and these delicious and nutritious sweet potato fries. My family (including my picky eater) can't seem to get ENOUGH of these!

    Sweet potatoes have to be one of the most nutrient packed veggies on the planet! They are choc full of vitamins, minerals, antioxidants, and more! Check out this link for all of the wholesome goodness in just 1 cup of sweet potatoes: http://nutritiondata.self.com/facts/vegetables-and-vegetable-products/2667/2  Who knew right?!
    Not only are sweet potatoes better for you than regular potatoes but baked food is significantly healthier for you than fried food.
    If you've never made these before then please give 'em a try! I promise your life will never be the same!


    Here's what you'll need:
    • Cookie Sheet
    • Sharp Cutting Knife
    • Potato Peeler (Unless you prefer fries with skins on)
    • 1/4 C. Extra Virgin Olive Oil (E.V.O.O.)
    • 2-3 Sweet Potatoes (approx. 1.5 lbs)
    • 1/2 tsp. Sea Salt (NOTE: You can also try adding other/additional seasonings to spice things up a bit!                 A couple  ideas are cinnamon/chipotle and  rosemary/parmasain (can I say YUM?!) or just                   add a  bit of paprika along with the salt...and if you'd really like to heat things up try adding               some cyanne to the mix!)
     Directions:
    1. Preheat oven to 425 (400 for high altitudes).
    2. Wash and peel potatoes.
    3. Cut sweet potatoes in to strips that are approx. 1/2 inch on each side.
    4. Place potato strips on cookie sheet and pour E.V.O.O. over top of them. 
    5. Add sea salt (and/or seasonings of your choice) and toss all of the ingredients until potatoes are evenly coated (I use my hands but a metal spatula works just as well. Also, you may prefer to shake your ingredients together in a zip-lock bag...this is something fun that littles can help with).
    6. Spread potatoes strips in a single layer on the cookie sheet.
    7. Place cookie sheet on the center oven rack and bake for (approx) 30 minutes (or until golden brown and crispy), turning every 8-10 minutes.
    8.  Enjoy! 

    * Serves 4-6 

    Step #3
    Step #6


    Scrumptious!

    My little helper
    ...and for dessert...mmm!


    Be sure to let me know how you like 'em!